Akai AMD75 User Manual
Browse online or download User Manual for Home audio sets Akai AMD75. Akai AMD75 home audio set
- Page / 27
- Table of contents
- TROUBLESHOOTING
- BOOKMARKS
- Microset Radio DVD-player 1
- Table of contents 2
- Copyright notice 2
- Safety1 3
- Preparations for use2 4
- Installation3 5
- Installing the speakers3.1 6
- Connection to speakers 7
- Connection to the appliance 7
- Audio connections (input) 8
- Audio connections (output) 8
- Video connections 8
- Cable connection 8
- Connecting the units3.3 9
- Connecting to the mains3.4 9
- Remote control3.5 10
- Functions4 11
- Remote control4.2 12
- Operation5 13
- CD/DVD functions 14
- Radio functions 14
- USB functions 14
- Clock functions 14
- CD/DVD functions5.2 15
- Using the PROGRAM function 16
- Using the ZOOM function 16
- Radio functions5.3 17
- USB functions5.4 18
- Clock functions5.5 18
- (DVD mode only) 19
- General setup page 20
- Audio setup page 20
- Video setup page 21
- Preference setup page 21
- Cleaning and maintenance6 22
- Troubleshooting7 23
- MP3 playback 24
- Technical data8 25
- Disc output 26
- Speaker system 26
- Remote control 26
- Supported media formats 26
- Working environment 27
Summary of Contents
Microset Radio DVD-playerwith USB-portALD1915HGB 2NL 28FR 56ES 84DA 171DE 112EL 142User manualGebruiksaanwijzingManuel de l’utilisateurManual de i
10Remote control3.5 Installing the batteries● Remove the battery cover.● Insert the batteries matching the (+) and (-) polarity markings.● Re-insta
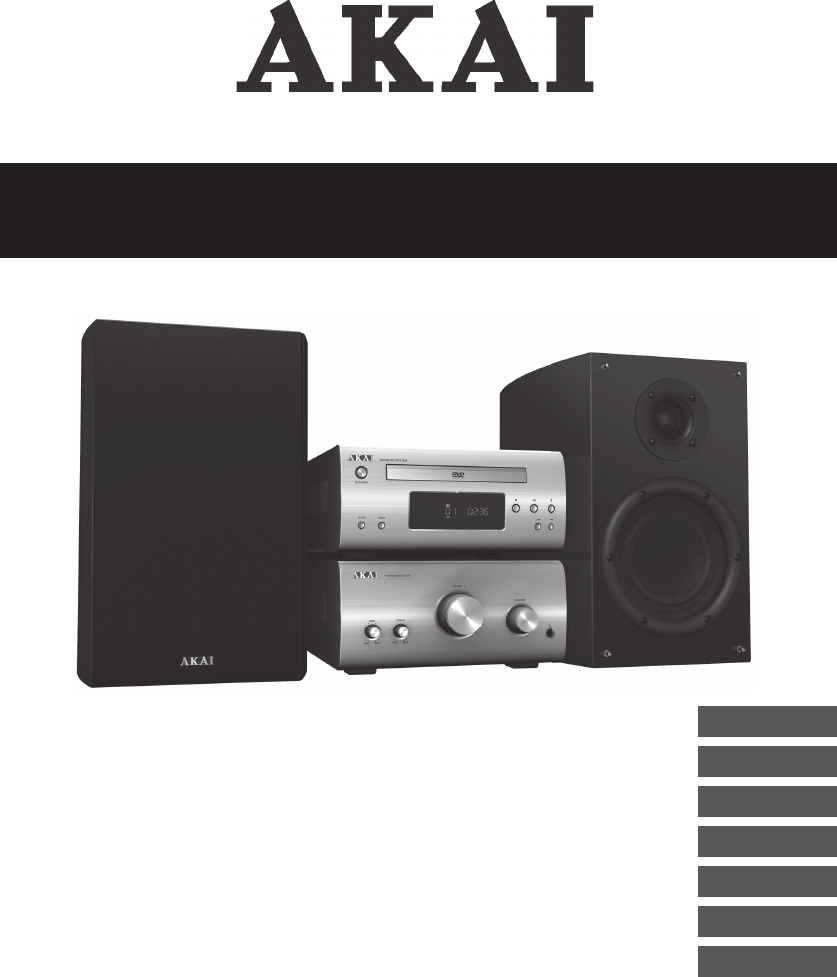
11AMD75Functions4. DVD Micro System4.1 324131415678121091511Front panel1 Disc tray2 STANDBY button3 CLOCK button4 MODE button5 Display6 Bass dia
12Back panel1616 USB slotRemote control4.2 General functions17 STANDBY button18 Function buttons19 P-EQ button20 LOUDNESS button21 S-BASS button
13AMD75DVD/VCD/CD functions33 SUBTITLE button34 ZOOM button35 NEXT button36 PREV button37 PLAY/PAUSE button38 BACKWARD button39 MODE button40
14● To adjust the tone (bass/treble), press the LOUDNESS button (20) or the S-BASS button (21).● To switch between sound effects (USER/POPS/JAZZ/CLA
15AMD75CD/DVD functions5.2 After the disc has been loaded, a content menu will display on the TV screen.● Press the arrow buttons (25) to select a me
16● Press the GOTO button (41).● Press the arrow buttons (25) to select an entry.The possible entries for DVD are:- Disc time- Chapter- Title- C
17AMD75● Press the PROGRAM button (42) to change the mode. Press the ENTER button (26) to conrm.● Press the PLAY/PAUSE button (37) to hold the slid
18USB functions5.4 After the device has been connected, a content menu will display on the TV screen.● Press the arrow buttons (up and down) (25) to
19AMD75Setting the daily timerThe daily timer can be set to switch on the appliance automatically at a certain time every day. The daily timer can onl
Table of contentsCopyright noticeDesign and specications are subject to change without notice.1. Safety ...
20● Press the ENTER button (26) to select a setting, or the left arrow button to cancel the selection.● Press the SETUP button (24) to store the set
21AMD75AUDIO SYNC● Set the delay time when the image and the sound cannot be played at the same time (0 ~ 200 ms).Video setup pageCOMPONENT● Select
22AUDIOThis function is only available when the disc supports the function.● Select the audio language: English/French/Spanish/Chinese/Japanese/Korea
23AMD75● Clean the outside of the appliance with a soft cloth. When the appliance is very dirty, dampen the cloth slightly with water and a neutral s
24DVD/CDTrouble ActionNo playback There is no disc inserted. Load a disc in the appliance. Disc is loaded upside down. Place the disc with the la
25AMD75USB playbackTrouble ActionNo playback USB device is not installed or installed incorrectly. Insert USB device into slot. Incompatible USB
26TunerParameter ValueFM radio 87.5 mHz - 108 MHzDisc outputParameter ValueLaser type SemiconductorSignal/noise ratio ≥ 40 dB (1 kHz)Frequency ra
27AMD75Working environmentParameter ValueOperating temperature -10 ~ +40 °CRelative humidity 5% ~ 90% Disposal of used electrical 9. and electronic
3AMD75Safety1. Intended use1.1 The DVD Micro System plays music from CD and radio and music, videos and photos from DVDs and USB. The appliance also p
4i A note gives additional information, e.g. for a procedure.General safety instructions1.3 ! WARNING Do not put force on the appliance. The applia
5AMD75i We recommend that you retain the original carton and packing materials in case it ever becomes necessary to return your product for service.
6i This appliance is equipped with rubber feet to prevent it from moving. The feet are made from non-migrating material specially formulated to avoid
7AMD75Connection to speakers● Loosen the binding post to open the terminals.● Connect the wire ends to the speakers matching the (+) and (-) polarit
88 9AMD75Audio connections (input)● Stereo audio: Connect a suitable cable to the L/R channels of the AUX IN connection.Audio connections (output)The
8 9AMD75Connecting the units3.3 ● Insert the power connection cable into the CABLE connections to connect the units.Connecting to the mains3.4 ● Con
© 2020, manymanuals.com. All rights reserved. | 0.467 s |
 Manymanuals.com
 Manymanuals.de
 Manymanuals.fr
 Manymanuals.it
 Manymanuals.pl
 Manymanuals.cz
 Manymanuals.es
 Manymanuals-pt.com
Comments to this Manuals